Adding images to the web is simple to do, but there are a number of things to consider when you do. For instance, oversized and large images can slow down your web pages, impacting user experience and your rankings in search results. We have a number of site optimizations in place on the site, including image optimization, but here is how you can help your website and create a better user experience for those visiting.
When uploading images, be sure to upload images at or close to the dimensions that they will appear on the page. Your images should be no larger than 2MB, and ideally, they will be optimized for the web. TinyJPG and TinyPNG are excellent tools to reduce file sizes prior to uploading.
To add an image, choose the media icon in the content editor (WYSIWYG).

Upload or select your media and add meaningful alt text.
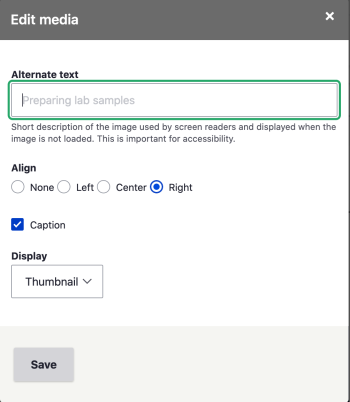
By default, images will display at the width you upload them. You may choose to display a formatted thumbnail instead. The thumbnail will resize your image to 350px wide x any height. Simply choose "Thumbnail" as your Display option.
You may also align and caption your image with the options seen in the screenshot. If you choose to caption your image, you will see a text box placed at the bottom of the image you added. Simply add your caption text.